Everything About Facebook Messenger Settings
For anyone wanting to know & understand about Facebook messenger settings.
Yes, I do teach about Chatbots & such but only to be used in a non-spammy way along with being designed to be user-friendly.
Facebook Messenger is one of the most common platforms for communication these days, from personal uses, all the way to utilize it to get the most out of your business. Many companies have jumped on this, and therefore, it’s important to know that the reason for this is because it can literally help companies connect to the billions of people all around the globe using Facebook Messenger each day.
What originally started out as a basic messaging platform is now an advanced powerhouse that can fully be used to increase sales, revenue, and return on investment. One of these ways is by using chatbots, and we’ll get to that shortly.
However, the most important things to consider are the special Facebook settings that can be accessed on your page.
What Do I Need For This Guide?
If you’re a business, or you’re setting up a business (or someone else’s), it’s important that you, first of all, have a created Facebook Page, whether it be a business page, or just your sole proprietorship (even Fan pages) aside from your main profile.
In this guide, we’re going to cover the basic settings so you can use your chatbot (such as ManyChat, which we’ll explain in this tutorial) to get the most out of your messaging capabilities. The key isn’t necessarily to sound like a product salesman on Facebook Messenger.
But more than anything, sound professional and keep your Messenger clean and neat, but efficient in order to get people to come to your page to connect with you.
Basic Messenger Settings
In the most professional sense of operating a business using Facebook Messenger as a contact platform, you’ll want to look into the messenger settings in Facebook, as well as a few others to get the most out of using Facebook as the primary contact method.
If you don’t have a chatbot, no problem, but you’ll want to have a few things set just right. If you do have a chatbot, you’ll also want to access a few other settings which we’ll cover soon. However, these basic message settings are to help you just appear more approachable as a business overall, and will make it easier for your customers to reach you.
- The first thing you want to do is access settings. From your Facebook profile, click the dropdown arrow on the right, and click on your page you want to enter the admin for. You’ll now be on the admin panel for your page.
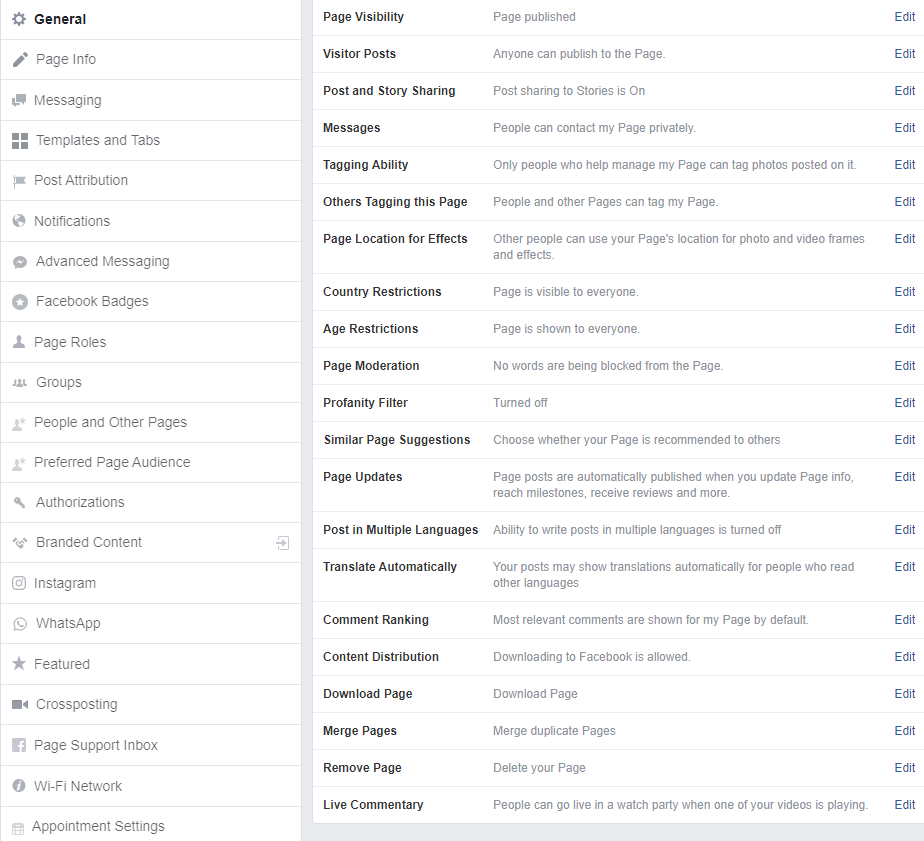
- On the top right of the white menu bar (just under the blue Facebook menu at the top of the page), you’ll see Settings. Click it to access the back-end control panel. On the left of the page that comes up, you’ll see a full menu of all sorts of settings that you probably didn’t know about.
- Click on the Messaging setting on the left-hand menu. This will show you in general how people can message you via your “page” persona. On the right-hand side, it will list numerous settings you can look at, enable, disable, and so forth. Therefore, it’s important that you make sure some basic settings are enabled on this page.
-
- Use the Return key to send messages
Make sure this is turned on. It’s a default in Messenger for personal profiles, so why not have this set the exact same? It will also help you when it comes to using chatbots, as we’ll explain later. - Prompt people to send messages
You’ll want this setting enabled as well, so turn it on. What this does is automatically pop up your messenger when they visit your page. - Response Assistant
We’ll cover more about this, as Facebook recently changed their API. In this setting, you’ll want to click on the link that states “Go to Automated Responses” below this, but there is a completely different set of rules that apply here, whether you have or don’t have a chatbot, and depending on your business type.
- Use the Return key to send messages
Show a Messenger Greeting
Turn this on. This will enable people to see a default greeting when they visit your page. It is highly recommended that you change this to represent your business, and at the same time, connect with customers on a personal level. This applies whether you have a chatbot or not.
NOTE: This is a great place to throw a couple emoticons. If you need to find an easy way to copy them to your custom message, you can find them on EmojiPedia under Facebook for a full list of Facebook emoticons
- Appointment Messaging Settings – Reminders
This is an automatic reminder for professional purposes that sends customers reminders via messenger or text message the day before they have their appointment scheduled with you. This is a great way to deal with things when it comes to setting appointments with customers or clients.
The next section is going to cover some more things that will help your Messenger be more interactive, and also help your chatbot (we recommend & use ManyChat) be able to communicate with your messaging better.
What is a Chatbot?
Using a chatbot is the primary way to connect with customers on a business level in 2019, and it’s expected to grow by the year 2020. Your chatbot can actually alert you on a business level that you had a customer send a message, and therefore, it can also help to answer frequently asked questions, offer “suggestive sales” (without sounding too sales-oriented), as well as offer customer and technical support.
The reason they are so awesome is that they can literally be programmed without the knowledge of programming languages, and they can act as a virtual assistant for you. Now that we’ve got the basic Messenger settings out of the way, we’ll show you how to set up your Chatbot and connect it with Facebook Messenger.
And then we’ll show you some secret tips that can greatly help your chatbot with providing a personalized experience for both your business and your customers.
Get Your Chatbot Going
ManyChat offers both free and paid bots for your business. You can start out with a free account that automatically lets you have unlimited subscribers, basic templates, audience segmentation (for choosing your target audience), four growth tools, a visual flow builder, rich media conversations, unlimited broadcasts (messages you can send to all of your subscribers at once, just like you would with e-mail marketing), and landing pages & web widgets. As you grow, you can go for the Pro package for a measly ten bucks.
- The first thing you’ll want to do is set up your ManyChat Bot and sign up for service. Simply head over to the ManyChat website and click the Get Started Free button.
- You’ll come to a page where you’ll want to connect with Facebook. Simply click the “I agree to ManyChat’s Terms of Service and Privacy Policy checkbox, and then click “Sign In With Facebook”. It will take you to a page to allow ManyChat to connect with your page, similar to what other apps do.
- Next, you’ll go to a page where you can share some information about yourself. You can describe how detailed your marketing campaigns are (like whether you use e-mail campaigns, automated apps, or advanced marketing apps like Zapier, etc.), and your business size.
- You now are connected to ManyChat, but you need to connect it with your business page. Click the Connect button to connect your business page you want ManyChat to operate on, or simply create a Facebook Page in this section. When you click the connect button, it automatically submits the information.
- Choose your purpose for using ManyChat. Make sure you tick the checkbox if you’re setting it up for a client under your name however. You’ll be then taken to your ManyChat dashboard.
If you’re not using Messenger without a chatbot, you don’t need to do this, but after this part, you can literally control all of those extra settings in Messenger, such as your growth tools (which are extremely important), your greeting, and more.
Messenger Platform Settings
In Messenger Platform Settings on Facebook, there are more detailed uses that once you’re all signed up for ManyChat, you should have the settings in Facebook automatically connected to ManyChat. Scroll down this page and look at the General Settings, Connected Apps (ManyChat should automatically be there if you’re using it), Share Attribution, Whitelisted Domains, and even see your whitelisted domains.
Response Method
Make sure that you have Responses are all automated selected. This is extremely important because everything will be set in your ManyChat Dashboard.
Connected Apps
If you signed up for a chatbot like ManyChat, you’ll want to make sure that it’s connected and has full permissions to access your page and Messenger.
Share Attribution
You don’t need to worry about this part.
Whitelisted Domains
You can enter these manually if you are using a general Facebook “bot” feature, however if you’re using ManyChat, you can simply add this information with ManyChat’s Growth Tools section to add whitelisted domains. If you ever get an SDK error, you don’t have your website whitelisted and attached to your ManyChat bots.
Your Messenger Link
This is simply a link you can copy and paste. It will actually take the user to your Facebook Messenger so they can send you messages instantly by clicking the link. It’s the same thing as your Bot Link on your ManyChat pages.
Advanced Messaging Features
In July of 2019, Facebook changed the way that they did things when it came to the advanced features of Subscription Messaging. In the past, it was recommended, but now it’s not necessary since they changed the way the Subscription Messaging API works. If you wish to sign up for Subscription Messaging, and you’re delivering high volumes of information from your business, then you may consider going ahead and signing up.
Info and People
Info and People are automatically selected, and you don’t really need to worry about all of those details, but they are optional, like choosing the gender, time zone, and locale.
Discover Settings
Every time that you make a dedicated change like your category, keywords, name, summary, etc., you need to fill out the Discover Preference of your bot. This is where you briefly tell them what your bots about.
- Overview, Keywords, Name, Summary
You don’t want to actually immediately sell things. You want to provide a good description with honesty and detail. You want to use things like keywords and your business information (it just needs to be a brief summary about your business) wisely and carefully. Make sure it looks professional, without looking like you’re selling a car before someone can even connect with you. - Discover Visibility
Always have this enabled. This will allow you to have Facebook display your bot and make it discoverable on their “bots” page. If your page was extremely high volume (receiving millions of messages per day), you may want to go ahead and disable this setting. - High Volume Messages
This setting is there by default, and all high volume messages go to your Page Support Inbox.
Page Support Inbox
Make sure that your Page Support Inbox is empty. If Facebook is trying to contact you, this is where you will get warnings and information, or requests for information. You should check this inbox at least once or twice every month.
Even if Facebook wants to just connect to your page and ask for additional information; you want to reply as soon as possible. You don’t EVER want to respond to Facebook like a salesman.
Response Assistant: Advanced Details
We mentioned these briefly, earlier, and there are specific settings that you’ll want to change once your page is set up with ManyChat. Some businesses that don’t use chatbots do leave these on if they’re using Facebook for their primary business messaging without a chatbot, but we highly recommend turning everything off as much as possible when you’re trying to use ManyChat.
When you click the link under Response Assistant that says “Go to Automated Responses”, you’ll be taken to a page where you can choose an away message, instant reply (which tells customers that you’ll respond within a set time). This way Facebook isn’t going to be doing anything over your bot’s control.
Setting Up your Button on Facebook
This is one of the biggest mistakes that numerous people make on an average basis. By choosing the wrong button, you are actually taking away clients from contacting you on Messenger, and therefore, you may not get as many connections with your customers and clients, since the majority of them are probably on Facebook Messenger.
This is especially crucial when it comes to setting up your Chatbot to have the right button displayed for your call to action button on your Facebook Page.
Set Your Button
If you have a button set up, then you already probably know how to change or edit your button. If it’s not to send you a message, you want people to be able to do so. If you don’t have a button, simply click the “Add a Button” section.
Contacting
On the button setup popup that is displayed, click the dropdown arrow on the menu you see where it says Contact you. You want people to be able to send you a message. While some people prefer the “Contact Us”, most people use Send Message. This makes the people visiting your page feel they can directly contact your business. Once you select Send Message, click the “Next” button.
Step 2
While this is actually the third step, it will show on Facebook as “Step 2: Where would you like this button to send people?”, and below that you will see Messenger. Even though everything looks somewhat grayed out, you can click the Messenger in the little white box and then click “Finish”. Then you can proceed to the final step, which is testing to make sure everything works right.
Once You’re All Set Up
After you’ve finished all of your setup with your bot, you want to always test it. Also, do this anytime that you make a change to your greeting, answers, etc., and want to test it. When you want to test this, simply go to your Facebook Page and hover over the “Send Message” button, which you should always have to make you more approachable by customers.
- Hover over the “Send Message Button” and in the submenu that pops up, click “Test button”. If you previously had a Facebook conversation test up, you can simply delete the conversation and choose to test it again and it will initialize your conversation again. This is really helpful when making changes, or when you’re testing a client’s chatbot that you’re working on.
- Go back to ManyChat’s Dashboard, and disable the Default reply under the automation menu. It eliminates the “Page name generally replies in 1 day”. Therefore, you can control the automated message and your bot. While this choice is optional, if you’re wanting to have more control over your bot, you should disable this setting.
- Test again, as it’s a generally good practice to double-check your work.
By testing your messages, you are making sure that you have the exact text you put into the greeting, and more. If you go into ManyChat, you can preview your message and even if you pull up the “phone” format, it will display what your Facebook greeting and message will look like when a customer contacts you via Messenger on their smartphones or mobile devices.
Your chatbot is now completely set up, and of course, there are many more details and settings that you can dig into later on, and we can simply get onto those another time.
Otherwise, once you have these basic settings created, you can start to really experiment more with Facebook and chatbot integration, as well as even allow the connection of your ManyChat bot to be available on other platforms, such as your website, your online store, and so much more. The opportunities are virtually endless!
Facebook Messenger is one of the most common platforms for communication these days, from personal uses, all the way to utilize it to get the most out of your business. Many companies have jumped on this, and therefore, it’s important to know that the reason for this is because it can literally help companies connect to the billions of people all around the globe using Facebook Messenger each day.
What originally started out as a basic messaging platform is now an advanced powerhouse that can fully be used to increase sales, revenue, and return on investment. One of these ways is by using chatbots, and we’ll get to that shortly.
However, the most important things to consider are the special Facebook settings that can be accessed on your page.
What Do I Need For This Guide?
If you’re a business, or you’re setting up a business (or someone else’s), it’s important that you, first of all, have a created Facebook Page, whether it be a business page, or just your sole proprietorship (even Fan pages) aside from your main profile.
In this guide, we’re going to cover the basic settings so you can use your chatbot (such as ManyChat, which we’ll explain in this tutorial) to get the most out of your messaging capabilities. The key isn’t necessarily to sound like a product salesman on Facebook Messenger.
But more than anything, sound professional and keep your Messenger clean and neat, but efficient in order to get people to come to your page to connect with you.
Basic Messenger Settings
In the most professional sense of operating a business using Facebook Messenger as a contact platform, you’ll want to look into the messenger settings in Facebook, as well as a few others to get the most out of using Facebook as the primary contact method.
If you don’t have a chatbot, no problem, but you’ll want to have a few things set just right. If you do have a chatbot, you’ll also want to access a few other settings which we’ll cover soon. However, these basic message settings are to help you just appear more approachable as a business overall, and will make it easier for your customers to reach you.
- The first thing you want to do is access settings. From your Facebook profile, click the dropdown arrow on the right, and click on your page you want to enter the admin for. You’ll now be on the admin panel for your page.
- On the top right of the white menu bar (just under the blue Facebook menu at the top of the page), you’ll see Settings. Click it to access the back-end control panel. On the left of the page that comes up, you’ll see a full menu of all sorts of settings that you probably didn’t know about.
- Click on the Messaging setting on the left-hand menu. This will show you in general how people can message you via your “page” persona. On the right-hand side, it will list numerous settings you can look at, enable, disable, and so forth. Therefore, it’s important that you make sure some basic settings are enabled on this page.
-
- Use the Return key to send messages
Make sure this is turned on. It’s a default in Messenger for personal profiles, so why not have this set the exact same? It will also help you when it comes to using chatbots, as we’ll explain later. - Prompt people to send messages
You’ll want this setting enabled as well, so turn it on. What this does is automatically pop up your messenger when they visit your page. - Response Assistant
We’ll cover more about this, as Facebook recently changed their API. In this setting, you’ll want to click on the link that states “Go to Automated Responses” below this, but there is a completely different set of rules that apply here, whether you have or don’t have a chatbot, and depending on your business type.
- Use the Return key to send messages
Show a Messenger Greeting
Turn this on. This will enable people to see a default greeting when they visit your page. It is highly recommended that you change this to represent your business, and at the same time, connect with customers on a personal level. This applies whether you have a chatbot or not.
NOTE: This is a great place to throw a couple emoticons. If you need to find an easy way to copy them to your custom message, you can find them on EmojiPedia under Facebook for a full list of Facebook emoticons
- Appointment Messaging Settings – Reminders
This is an automatic reminder for professional purposes that sends customers reminders via messenger or text message the day before they have their appointment scheduled with you. This is a great way to deal with things when it comes to setting appointments with customers or clients.
The next section is going to cover some more things that will help your Messenger be more interactive, and also help your chatbot (we recommend & use ManyChat) be able to communicate with your messaging better.
What is a Chatbot?
Using a chatbot is the primary way to connect with customers on a business level in 2019, and it’s expected to grow by the year 2020. Your chatbot can actually alert you on a business level that you had a customer send a message, and therefore, it can also help to answer frequently asked questions, offer “suggestive sales” (without sounding too sales-oriented), as well as offer customer and technical support.
The reason they are so awesome is that they can literally be programmed without the knowledge of programming languages, and they can act as a virtual assistant for you. Now that we’ve got the basic Messenger settings out of the way, we’ll show you how to set up your Chatbot and connect it with Facebook Messenger.
And then we’ll show you some secret tips that can greatly help your chatbot with providing a personalized experience for both your business and your customers.
Get Your Chatbot Going
ManyChat offers both free and paid bots for your business. You can start out with a free account that automatically lets you have unlimited subscribers, basic templates, audience segmentation (for choosing your target audience), four growth tools, a visual flow builder, rich media conversations, unlimited broadcasts (messages you can send to all of your subscribers at once, just like you would with e-mail marketing), and landing pages & web widgets. As you grow, you can go for the Pro package for a measly ten bucks.
- The first thing you’ll want to do is set up your ManyChat Bot and sign up for service. Simply head over to the ManyChat website and click the Get Started Free button.
- You’ll come to a page where you’ll want to connect with Facebook. Simply click the “I agree to ManyChat’s Terms of Service and Privacy Policy checkbox, and then click “Sign In With Facebook”. It will take you to a page to allow ManyChat to connect with your page, similar to what other apps do.
- Next, you’ll go to a page where you can share some information about yourself. You can describe how detailed your marketing campaigns are (like whether you use e-mail campaigns, automated apps, or advanced marketing apps like Zapier, etc.), and your business size.
- You now are connected to ManyChat, but you need to connect it with your business page. Click the Connect button to connect your business page you want ManyChat to operate on, or simply create a Facebook Page in this section. When you click the connect button, it automatically submits the information.
- Choose your purpose for using ManyChat. Make sure you tick the checkbox if you’re setting it up for a client under your name however. You’ll be then taken to your ManyChat dashboard.
If you’re not using Messenger without a chatbot, you don’t need to do this, but after this part, you can literally control all of those extra settings in Messenger, such as your growth tools (which are extremely important), your greeting, and more.
Messenger Platform Settings
In Messenger Platform Settings on Facebook, there are more detailed uses that once you’re all signed up for ManyChat, you should have the settings in Facebook automatically connected to ManyChat. Scroll down this page and look at the General Settings, Connected Apps (ManyChat should automatically be there if you’re using it), Share Attribution, Whitelisted Domains, and even see your whitelisted domains.
Response Method
Make sure that you have Responses are all automated selected. This is extremely important because everything will be set in your ManyChat Dashboard.
Connected Apps
If you signed up for a chatbot like ManyChat, you’ll want to make sure that it’s connected and has full permissions to access your page and Messenger.
Share Attribution
You don’t need to worry about this part.
Whitelisted Domains
You can enter these manually if you are using a general Facebook “bot” feature, however if you’re using ManyChat, you can simply add this information with ManyChat’s Growth Tools section to add whitelisted domains. If you ever get an SDK error, you don’t have your website whitelisted and attached to your ManyChat bots.
Your Messenger Link
This is simply a link you can copy and paste. It will actually take the user to your Facebook Messenger so they can send you messages instantly by clicking the link. It’s the same thing as your Bot Link on your ManyChat pages.
Advanced Messaging Features
In July of 2019, Facebook changed the way that they did things when it came to the advanced features of Subscription Messaging. In the past, it was recommended, but now it’s not necessary since they changed the way the Subscription Messaging API works. If you wish to sign up for Subscription Messaging, and you’re delivering high volumes of information from your business, then you may consider going ahead and signing up.
Info and People
Info and People are automatically selected, and you don’t really need to worry about all of those details, but they are optional, like choosing the gender, time zone, and locale.
Discover Settings
Every time that you make a dedicated change like your category, keywords, name, summary, etc., you need to fill out the Discover Preference of your bot. This is where you briefly tell them what your bots about.
- Overview, Keywords, Name, Summary
You don’t want to actually immediately sell things. You want to provide a good description with honesty and detail. You want to use things like keywords and your business information (it just needs to be a brief summary about your business) wisely and carefully. Make sure it looks professional, without looking like you’re selling a car before someone can even connect with you. - Discover Visibility
Always have this enabled. This will allow you to have Facebook display your bot and make it discoverable on their “bots” page. If your page was extremely high volume (receiving millions of messages per day), you may want to go ahead and disable this setting. - High Volume Messages
This setting is there by default, and all high volume messages go to your Page Support Inbox.
Page Support Inbox
Make sure that your Page Support Inbox is empty. If Facebook is trying to contact you, this is where you will get warnings and information, or requests for information. You should check this inbox at least once or twice every month.
Even if Facebook wants to just connect to your page and ask for additional information; you want to reply as soon as possible. You don’t EVER want to respond to Facebook like a salesman.
Response Assistant: Advanced Details
We mentioned these briefly, earlier, and there are specific settings that you’ll want to change once your page is set up with ManyChat. Some businesses that don’t use chatbots do leave these on if they’re using Facebook for their primary business messaging without a chatbot, but we highly recommend turning everything off as much as possible when you’re trying to use ManyChat.
When you click the link under Response Assistant that says “Go to Automated Responses”, you’ll be taken to a page where you can choose an away message, instant reply (which tells customers that you’ll respond within a set time). This way Facebook isn’t going to be doing anything over your bot’s control.
Setting Up your Button on Facebook
This is one of the biggest mistakes that numerous people make on an average basis. By choosing the wrong button, you are actually taking away clients from contacting you on Messenger, and therefore, you may not get as many connections with your customers and clients, since the majority of them are probably on Facebook Messenger.
This is especially crucial when it comes to setting up your Chatbot to have the right button displayed for your call to action button on your Facebook Page.
Set Your Button
If you have a button set up, then you already probably know how to change or edit your button. If it’s not to send you a message, you want people to be able to do so. If you don’t have a button, simply click the “Add a Button” section.
Contacting
On the button setup popup that is displayed, click the dropdown arrow on the menu you see where it says Contact you. You want people to be able to send you a message. While some people prefer the “Contact Us”, most people use Send Message. This makes the people visiting your page feel they can directly contact your business. Once you select Send Message, click the “Next” button.
Step 2
While this is actually the third step, it will show on Facebook as “Step 2: Where would you like this button to send people?”, and below that you will see Messenger. Even though everything looks somewhat grayed out, you can click the Messenger in the little white box and then click “Finish”. Then you can proceed to the final step, which is testing to make sure everything works right.
Once You’re All Set Up
After you’ve finished all of your setup with your bot, you want to always test it. Also, do this anytime that you make a change to your greeting, answers, etc., and want to test it. When you want to test this, simply go to your Facebook Page and hover over the “Send Message” button, which you should always have to make you more approachable by customers.
- Hover over the “Send Message Button” and in the submenu that pops up, click “Test button”. If you previously had a Facebook conversation test up, you can simply delete the conversation and choose to test it again and it will initialize your conversation again. This is really helpful when making changes, or when you’re testing a client’s chatbot that you’re working on.
- Go back to ManyChat’s Dashboard, and disable the Default reply under the automation menu. It eliminates the “Page name generally replies in 1 day”. Therefore, you can control the automated message and your bot. While this choice is optional, if you’re wanting to have more control over your bot, you should disable this setting.
- Test again, as it’s a generally good practice to double-check your work.
By testing your messages, you are making sure that you have the exact text you put into the greeting, and more. If you go into ManyChat, you can preview your message and even if you pull up the “phone” format, it will display what your Facebook greeting and message will look like when a customer contacts you via Messenger on their smartphones or mobile devices.
Your chatbot is now completely set up, and of course, there are many more details and settings that you can dig into later on, and we can simply get onto those another time.
Otherwise, once you have these basic settings created, you can start to really experiment more with Facebook and chatbot integration, as well as even allow the connection of your ManyChat bot to be available on other platforms, such as your website, your online store, and so much more. The opportunities are virtually endless!
Smart Bot Marketers
Linking your website, Facebook, Facebook Messenger, and email marketing together makes digital marketing easy.
Using these services together has the ability to give you an understand what is needed to offer your services to the right audience at the right time. Making your cost per customer the best price ever while being user-friendly to your potential customers.
We strive to do our very best to keep you informed with all the latest trends & topics to help you with success.
Staying on the cutting edge along with remaining up to date with the latest changes with messenger marketing, we are always digging for the next big thing to help.
Getting the best information about marketing can be a choir to say to the least so our goal is to make this easy for you.
Whether it comes directly from us or from other lead marketers, the point behind Smart Bot Marketers is to guide along with help in any way we can.
Click one of our options we have listed to see if you have an interest.?
Chatbot Specialist